|
Getting
Started
Outlook Express comes as a
bundled application with Microsoft's Internet
Explorer web browser. If you need to upgrade or
add Outlook Express to your Programs group, you
can do so by downloading and installing a
suitable version of Internet Explorer from Microsoft's
website.
Once installed, open the
application by (double) clicking it's icon from
the Window's desktop or from the Window's
Programs Group by clicking the Start button and
then "Programs". The Outlook Express icon looks
like this:

The Main Outlook
Express Program
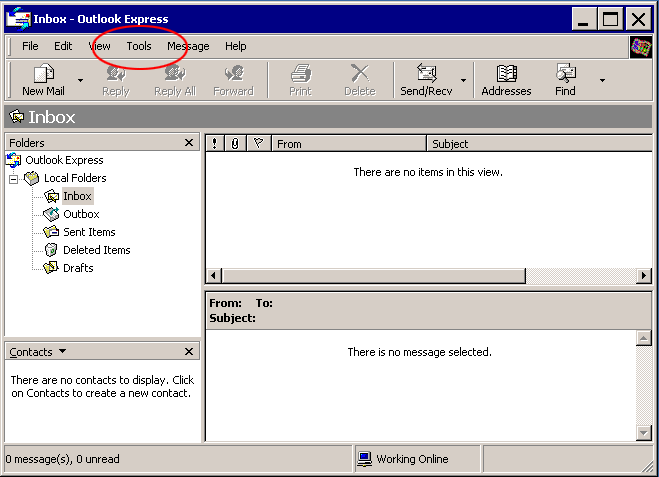
When you open Outlook Express, the main
screen is displayed. The program interface opens
complete with File Menu and Toolbar icons, as in
the following diagram:
Setup
a New E-Mail Account
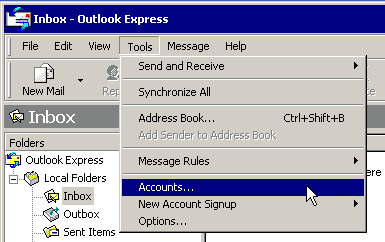
Once you have created a POP account user, you
can configure Outlook Express to send and
receive E-Mail using this account. To get
started click Tools, then Accounts
from the File Menu:
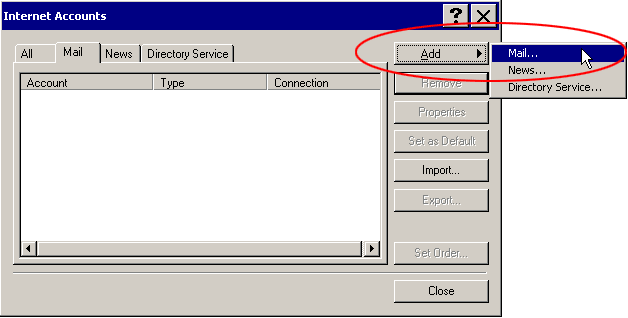
The Internet Accounts dialog box will be
revealed, allowing you to add and edit E-Mail
configurations in Outlook Express. Click
Add, then Mail:
The Internet Connection
Wizard
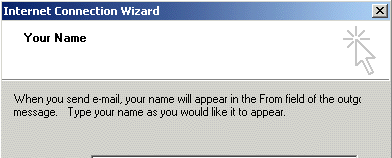
The Internet Connection Wizard,
launched by the previous step, will gather the
necessary configuration information required to
successfully complete the E-Mail Setup process.
Each of the wizard's screens will have a Back,
Next and Cancel button that you can use to
navigate forward and backwards in the
configuration process. The wizard begins by
asking for a display name - the same name your
recipients will see when you send them an
E-Mail:
|

|
Put your display
name here |

|

|
Click
Next.
The next screen will ask for your Internet
E-Mail address. This is composed of two parts:
the POP E-Mail username you created in your
Control Panel and the Domain Name associated
with your Web Hosting account:
Click
Next.
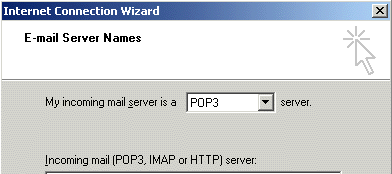
The following screen asks for your E-Mail
Server Names. The default settings are fine, so
you only need to precede your domain name with
"mail." as proposed below:
|

|
mail.yourdomain.com |

|

|

|
mail.yourdomain.com |

|

|
Click Next.
The final configuration screen asks for your
login information so that your Domain's mail
server knows the person checking mail is really
you. As above, the username is the POP Account
username you created in your Web Hosting Control
Panel. The password associated with this account
was also decided at this point, so you simply
need to insert them in the appropriate fields
below.
If you wish, Outlook Express can save your
password so you don't have to enter it each time
you check or send mail. To enable this, make
sure the "Remember Password" box is checked (has
a checkmark in it). Do NOT check "Log on using
Secure Password Authentication (SPA)"; we will
configure outgoing (SMTP) in the next step.
Click
Next, then Finish on the final
Congratulations screen.
Configuring
Outgoing (SMTP) E-Mail
At this point your Outlook Express client
program is ready to receive E-Mail. One last
setting must be adjusted in order to securely
send E-Mail using your E-Mail server. This is an
additional security precaution that <% DisplaySiteName() %>uses to reduce spam abuse
of our servers and systems, but also to continue
to protect our customer's interests wherever
possible.
In order to adjust the settings of Outlook
Express, we must return to the Internet Accounts
screen, found by clicking Tools, then
Accounts from the main Outlook window, as
described above.
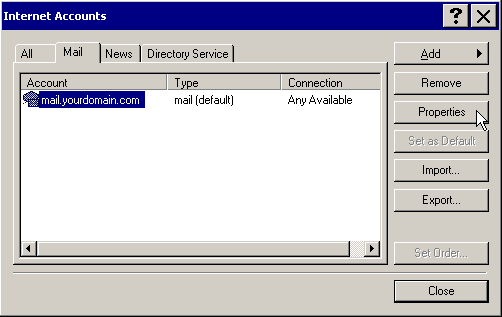
This time, an account already exists, so
click the mail account you just created and then
click Properties.
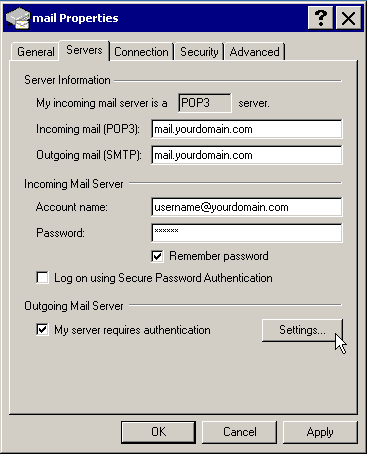
The properties dialog box pops up for this
POP account. There are tabs along the top that
allow configuration of various settings. Any
time a change or addition to your E-Mail
settings is required, these steps will be
followed to some degree. In this case we wish to
configure Outlook Express to authenticate (ask
for a password) when you send mail using your
account's E-Mail server. Click the Server
tab and then check the box next to "My
server requires authentication", as shown
below:
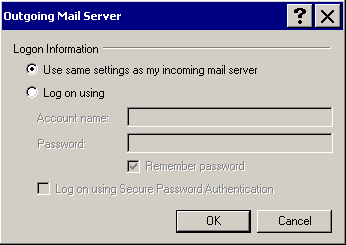
Click "Apply", then "OK" to
exit the Properties dialog box. You will not
need to enter the "Settings"
configuration unless you have specifically
configured a different account username and
password than your POP account information. If
you do have a specialized setup, this is what
the Outgoing Mail Server settings box
looks like:
Further Assistance &
Links
Microsoft has provided a variety of
additional support documents to allow users of
Outlook Express to tweak their installations and
configurations. We have provided a selection of
links that may be useful to you. We have also
Microsoft's Knowledge Base article number, in
case you have any trouble accessing these links.
Additonal questions may be directed to <% ContactCWH() %>.
How to Create and Use Identities
in Outlook Express 5 (Q209169)
How to Back Up Your Inbox
Assistant Rules in Outlook Express
(Q181084)
How to Change the Default Font in
Outlook Express (Q177897)
How to Import Outlook Contacts
into Outlook Express (Q177123)
How to Use Stationery in Outlook
Express (Q171245)
How to Identify the Version of
Outlook Express in Use (Q179590)
|